


Logging is a important but often overlooked part of an organization’s security posture. Logging without organization, searchability, or reporting leads to data being missed. This a continuation of a longer series that VDA Labs is writing on Graylog. This is part 5 of a multi-part series covering a variety of topics, including the following items:
- Installation, securing, and optimizing the setup part 1
- Installation, securing, and optimizing the setup part 2
- Domain Controller/DHCP log collection and alerts
- File/print server log collection and alerts
- Exchange server log collection
- IIS log collection
- Firewall log collection
- Setting up Threat Intelligence
- SQL Server
This week focuses on gathering logs from from Microsoft Exchange. These logs can help track and monitor users and greatly enhance troubleshooting and incident response event due to the correlation that can be completed.
Note: Exchange 2016 is being used. Some steps or logs may be different depending on the version of Exchange Server you are using.
Prerequisites
Enable Exchange Logging
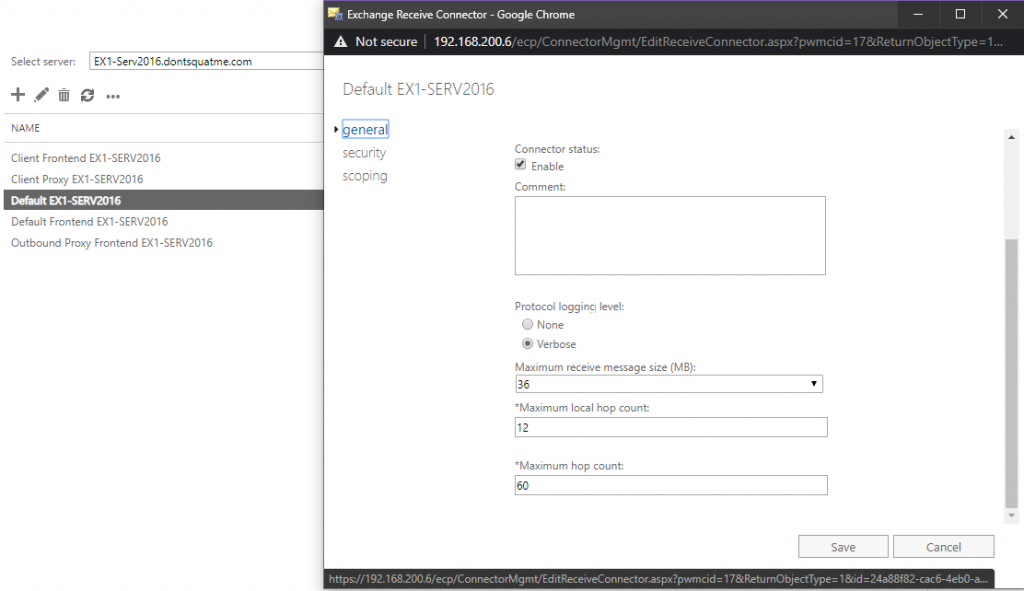
Before install the logging shipping agent enable receive connector logging for each receive and send connector in the organization has. This can be done by browsing to the ECP web interface and modifing each receive and send connector to enable “Verbose Logging” as shown in the image below.
Installing our Log Shipping Agent
To ship our Exchange logs, lets use NXlog Community Edition. This is a tool which can be configured to read just about any file or system input. There is also an enterprise support option available if required by your organization.
The Windows .MSI install will be used for this guide. Both the GraylogWeb.pem and GraylogWeb.key from part 2 of this series and the graylogca.pem from part one will be needed.
Installation
Installing NXLog is as simple as running through our download .msi installer. After installation is finished, the configuration needs to be written.
Configuration
The first step of this configuration is to copy the GraylogWeb.pem, GraylogWeb.key, and graylogca.pem to C:\Program Files(x86)\nxlog\certs. Without these files, the SSL connection to the Graylog input that was created in the last step will fail. With those files moved over, let’s start going over the configuration we need to create. Here is the complete configuration file, located in C:\Program Files(x86)\nxlog\conf\nxlog.conf:
## This is a sample configuration file. See the nxlog reference manual about the
## configuration options. It should be installed locally and is also available
## online at http://nxlog.org/docs/

## Please set the ROOT to the folder your nxlog was installed into,
## otherwise it will not start.

#define ROOT C:\Program Files\nxlog
define ROOT C:\Program Files (x86)\nxlog


Moduledir %ROOT%\modules
CacheDir %ROOT%\data
Pidfile %ROOT%\data\nxlog.pid
SpoolDir %ROOT%\data
LogFile %ROOT%\data\nxlog.log

<Extension ExchangeMessageTracking>
Module xm_csv
Fields $date_time, $client_ip, $client_hostname, $server_ip, $server_hostname, $source_context, $connector_id, $exchange_source, $event_id, $internal_message_id, $message_id, $network-message-id, $recipient_address, $recipient_status, $total_bytes, $recipient_count, $related_recipient_address, $reference, $message_subject, $sender_address, $return_path, $message_info, $directionality, $tenant_id, $original_client_ip, $original_server_ip, $custom_data, $transport-traffic-type, $log-id, $schema-version
FieldTypes string, string, string, string, string, string, string, string, string, integer, string, string, string, integer, integer, string, string, string, string, string, string, string, string, string, string, string, string, string, string, string
Delimiter ,
</Extension>

<Extension ExchangeConnectors>
Module xm_csv
Fields $date_time, $connector_id, $session_id, $sequence_number, $local_endpoint, $remote_endpoint, $event, $data, $context
FieldTypes string, string, string, string, string, string, string, string, string
Delimiter ,
</Extension>

<Extension gelf>
Module xm_gelf
ShortMessageLength 500
</Extension>

<Input EventLog_In>
# Use 'im_mseventlog' for Windows XP, 2000 and 2003
Module im_msvistalog
# Uncomment the following to collect specific event logs only
# Query <QueryList>\
# <Query Id="0">\
# <Select Path="Application">*</Select>\
# <Select Path="System">*</Select>\
# <Select Path="Security">*</Select>\
# </Query>\
# </QueryList>
</Input>


##Exchange 2007 default dir
#define BASEDIR C:\Program Files\Microsoft\Exchange Server\TransportRoles\Logs\MessageTracking
##Exchange 2010 default dir
#define BASEDIR C:\Program Files\Microsoft\Exchange Server\V14\TransportRoles\Logs\MessageTracking
##Exchange 2013/2016 default dir
define BASEDIR C:\Program Files\Microsoft\Exchange Server\V15\TransportRoles\Logs\MessageTracking
<Input ExchangeMessageTracking_In>
Module im_file
File '%BASEDIR%\MSGTRK20??????*-*.LOG'
SavePos TRUE
Exec $Message = $raw_event;
</Input>

<Input ExchangeReceiveConnector_In>

Module im_file
File "C:\Program Files\Microsoft\Exchange Server\V15\TransportRoles\Logs\FrontEnd\ProtocolLog\SmtpReceive\RECV*.LOG"
SavePos TRUE
Exec if $raw_event =~ /^#/ drop(); \
else \
{ \
ExchangeConnectors->parse_csv(); \
$SourceName = "ExchangeProtocol"; \
}
</Input>


<Output ExchangeMessageTracking_Out>
Module om_ssl
OutputType GELF_TCP
Host <FQDN>
CertFile C:\Program Files (x86)\nxlog\cert\GraylogWeb.pem
CertKeyFile C:\Program Files (x86)\nxlog\cert\GraylogWeb.key
CAFile C:\Program Files (x86)\nxlog\cert\graylogca.pem
Port 12201
</Output>

<Output ExchangeReceiveConnectors_Out>
Module om_ssl
OutputType GELF_TCP
Host <FQDN>
CertFile C:\Program Files (x86)\nxlog\cert\GraylogWeb.pem
CertKeyFile C:\Program Files (x86)\nxlog\cert\GraylogWeb.key
CAFile C:\Program Files (x86)\nxlog\cert\graylogca.pem
Port 12201
</Output>

<Output EventLog_Out>
Module om_ssl
OutputType GELF_TCP
Host <FQDN>
CertFile C:\Program Files (x86)\nxlog\cert\GraylogWeb.pem
CertKeyFile C:\Program Files (x86)\nxlog\cert\GraylogWeb.key
CAFile C:\Program Files (x86)\nxlog\cert\graylogca.pem
Port 12201
</Output>


<Route EventLog>
Path EventLog_In => EventLog_Out
</Route>

<Route ExchangeMessageTracking>
Path ExchangeMessageTracking_In => ExchangeMessageTracking_Out
</Route>

<Route exchange>
Path ExchangeReceiveConnector_In => ExchangeReceiveConnectors_Out
</Route>
Breaking Down The Configuration File
Some new sections have been added to our configuration file
Defining our log location
Different version of Exchange have various installation and logging directories. Make sure to uncomment the pertinent line for the Exchange install logs are being gathered from.
##Exchange 2007 default dir
#define BASEDIR C:\Program Files\Microsoft\Exchange Server\TransportRoles\Logs\MessageTracking
##Exchange 2010 default dir
#define BASEDIR C:\Program Files\Microsoft\Exchange Server\V14\TransportRoles\Logs\MessageTracking
##Exchange 2013/2016 default dir
##define BASEDIR C:\Program Files\Microsoft\Exchange Server\V15\TransportRoles\Logs\MessageTracking
<Input ExchangeMessageTracking_In>
Module im_file
File '%BASEDIR%\MSGTRK20??????*-*.LOG'
SavePos TRUE
Exec $Message = $raw_event;
</Input>
The receive connector logs location also need to be defined. Make sure to update the path to match the version of Exchange that is installed.
<Input ExchangeReceiveConnector_In>

Module im_file
File "C:\Program Files\Microsoft\Exchange Server\V15\TransportRoles\Logs\FrontEnd\ProtocolLog\SmtpReceive\RECV*.LOG"
SavePos TRUE
Exec if $raw_event =~ /^#/ drop(); \
else \
{ \
ExchangeConnectors->parse_csv(); \
$SourceName = "ExchangeProtocol"; \
}
</Input>
The next two sections define the CSV format of the two logs files NXlog is ingesting. Different versions of Exchange will have different fields and so these lines will need to be updated based on the data stored in Exchanges logs. The 4th line of each log should list all of the fields that the log contains. Each field will need its data type defined based on the type of data a field will contain.
<Extension ExchangeMessageTracking>
Module xm_csv
Fields $date_time, $client_ip, $client_hostname, $server_ip, $server_hostname, $source_context, $connector_id, $exchange_source, $event_id, $internal_message_id, $message_id, $network-message-id, $recipient_address, $recipient_status, $total_bytes, $recipient_count, $related_recipient_address, $reference, $message_subject, $sender_address, $return_path, $message_info, $directionality, $tenant_id, $original_client_ip, $original_server_ip, $custom_data, $transport-traffic-type, $log-id, $schema-version
FieldTypes string, string, string, string, string, string, string, string, string, integer, string, string, string, integer, integer, string, string, string, string, string, string, string, string, string, string, string, string, string, string, string
Delimiter ,
</Extension>
<Extension ExchangeConnectors>
Module xm_csv
Fields $date_time, $connector_id, $session_id, $sequence_number, $local_endpoint, $remote_endpoint, $event, $data, $context
FieldTypes string, string, string, string, string, string, string, string, string
Delimiter ,
</Extension>
Restart the NXLog service and Exchange logs should start appearing in the Graylog interface.
Setting up Graylog
With NXLog configured and shipping logs to the Graylog server, Graylog now needs to be configured to put the Exchange logs in their own index and parse out each log into individual searchable fields.
Creating the Exchange Index
With Exchange logs coming into Graylog it is important to start routing Exchange logs into their own indexes so the Exchange logs can be organized and stored as long as the business needed.
Browsing to the Graylog server, the Exchange logs are now coming in. Before doing anything else create a new Exchange index for the Exchange logs. For more detailed instructions on how to create indexes please see the instructions in part 3 of this blog series.

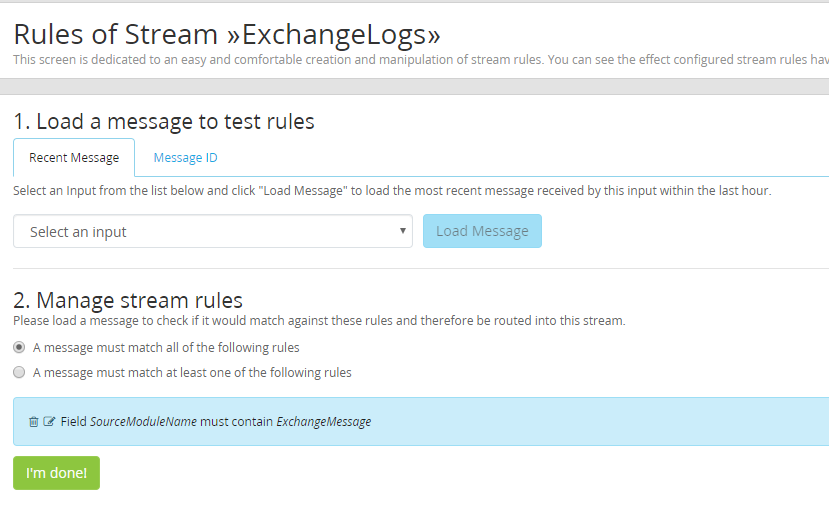
We will be keying in on the SourceModuleName of ExchangeMessage as a field starting with ExchangeMessage was created for both types of Exchange logs when NXLog was configured.
Parsing the Exchange Logs
If the setting up of the “Exchange Stream” was successful the next logs that come into Graylog from Exchange should be routed into the Exchange_0 index as shown in the screenshot below.
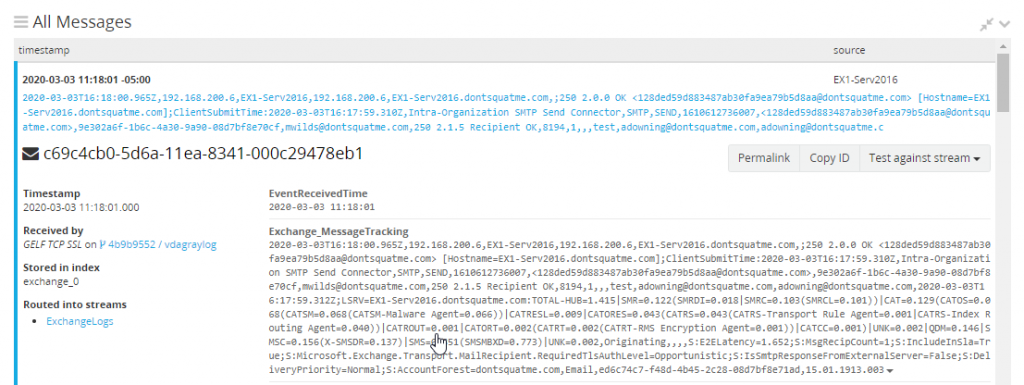
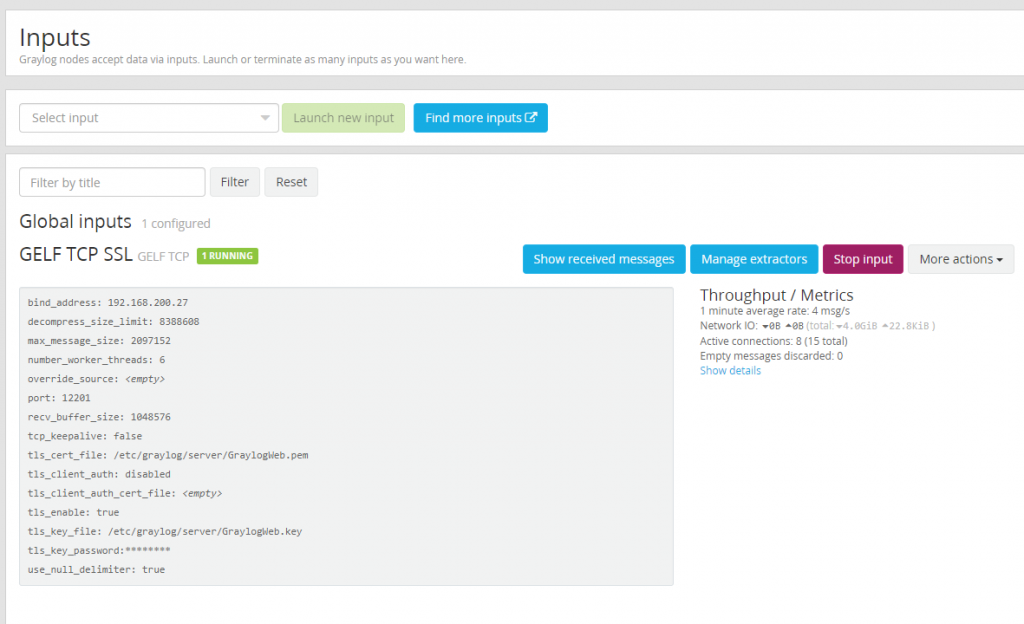
As shown in the picture above though, our logs are one large line that is not able to easily searched or organized. Fixing this problem will require creating a new extractor for Exchanges incoming logs. To modify the extractors being used browse to “System/Inputs” and select “Manage Extractors” on the GELF TCP SSL input that was created in part 1 and 2 of this blog.
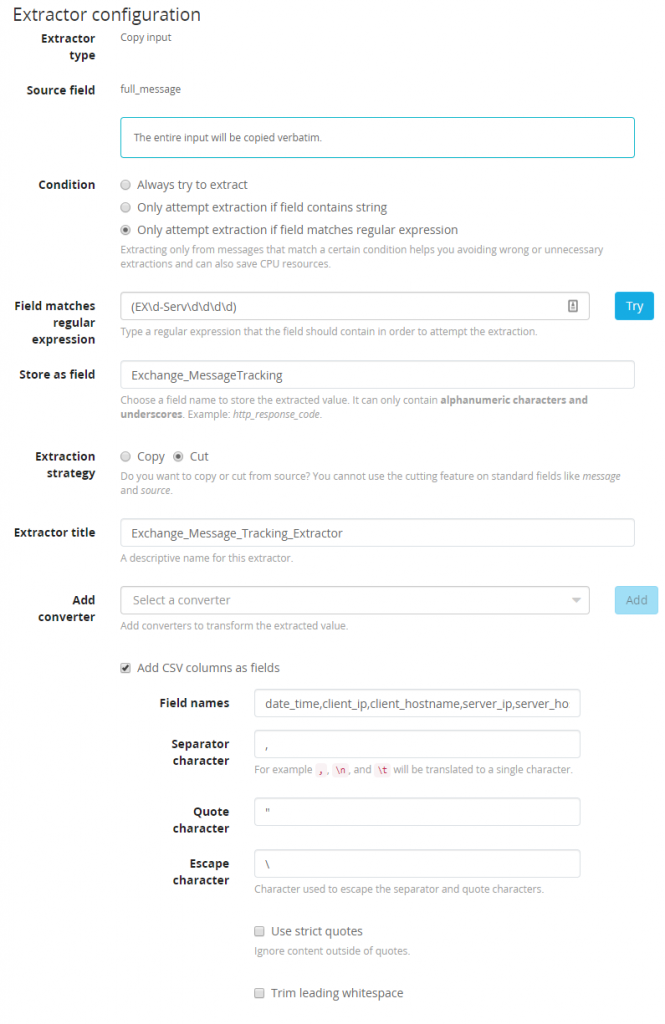
Before parsing data make sure to create a regular expression to match the naming format used for the organizations Exchange servers. The server being used for this blog has a name of EX1-Server2016 and the Regex of (EX\d-Serv\d\d\d\d) will match that naming scheme. This is to prevent the extractor from being running on every messages that comes into Graylog needlessly wasting precious CPU resources.
To break up the CSV files incoming to Graylog the following fields will be used for parsing the incoming CSV data.
date_time,client_ip,client_hostname,server_ip,server_hostname,source_context,connector_id,exchange_source,event_id,internal_message_id,message_id,network-message-id,recipient_address,recipient_status,total_bytes,recipient_count,related_recipient_address,reference,message_subject,sender_address,return_path,message_info,directionality,tenant_id,original_client_ip,original_server_ip,custom_data,transport-traffic-type,log-id,schema-version
The fields listed will differ based on the version of Exchange being used and can be copied from NXLog if the empty spaces and “$” between fields are removed.
Save the extractor and next time a Exchange message tracking log comes in each field should be broken out from our incoming CSV documents. Each field will now be individually searchable and able to create alerts and dashboards against.
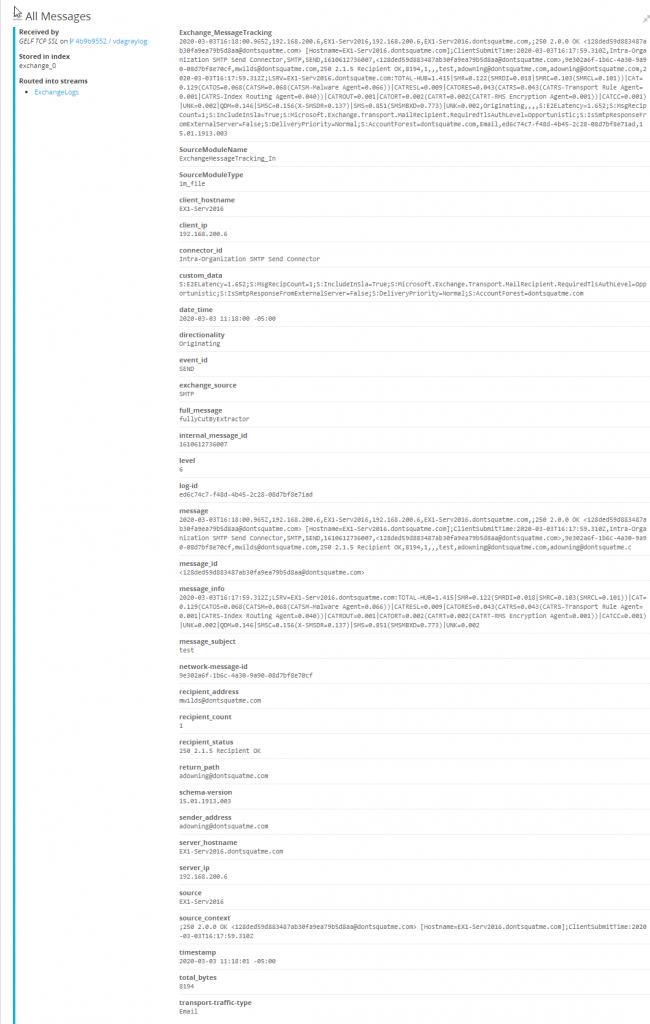
With logs being parsed it is possible to easily track the path a email takes through a enterprises systems. It is also possible to confirm or deny a email was received and by whom very easily. This can allow for administrators to see who a phishing email was sent to. This can allow SOC teams to start deleting offending emails from the system, verify from recipients that they did not interact with the phishing email, and begin a incident response process early into a incident if needed.
Stay tuned for part 6 of VDA’s blog series on Graylog where we will be covering parsing IIS logs.
Related Posts

4 Benefits of SIEM Software
Why SIEM Software is Essential for Your Business At VDA Labs, we pride ourselves on…

MSSP Services for Your Organization?
In today’s digital age, businesses face increasing threats from cyberattacks, data breaches, and other security…

How SIEM Helps Safeguard Your Business
VDA Vigilance SIEM Solution stands at the forefront of cybersecurity, offering unparalleled services in monitoring,…

4 Security Breaches SIEM Can Help Mitigate
Security Information and Event Management (SIEM) is a crucial component in the modern cybersecurity arsenal.…

What Is SIEM Software and How Does It Work?
Overview of Security Information and Event Management (SIEM) When it comes to information security, one…

Citrix ADC (Netscaler ADC) Multi-Factor Bypass
While working with a client, VDA engineers encountered an interesting circumstance that allowed for the…